Darla Daisies Loyalty Program & Tracking Form

Darla Hutt-Watson

My photo
Weaverville, CA, United States
Hi there! I'm Darla and I live in BEAUTIFUL Northern California! I am a mother of seven terrific kids and have been married to my husband for 32 years. I have been a Stampin' Up Demonstrator since 2010 and love ALL THINGS paper crafting. I also have a scrapbooking retreat business called Scrap Happens Retreats. I love teaching and learning new techniques, sharing ideas, hosting my retreats, being a wife and a mom. Hiking, bicycling, gardening and cooking are a few of my other hobbies. I'm living for Jesus and LOVIN' LIFE!!

Monday, September 29, 2014

Grateful

Good morning everyone!  I hope  you had a DELIGHTFUL weekend!  The weather was perfect here!  I was busy running kids to soccer games, sewing lessons and horseback riding lessons.  I was also BUSY getting ready for my upcoming retreat!  YEP...I have a four day scrapbooking retreat starting this Thursday....don't worry, I'll keep in touch!  Look for photos here next Monday to see how much fun we had!  

Today I have a card to share with you!  It's another fall card.....I LOVE FALL!

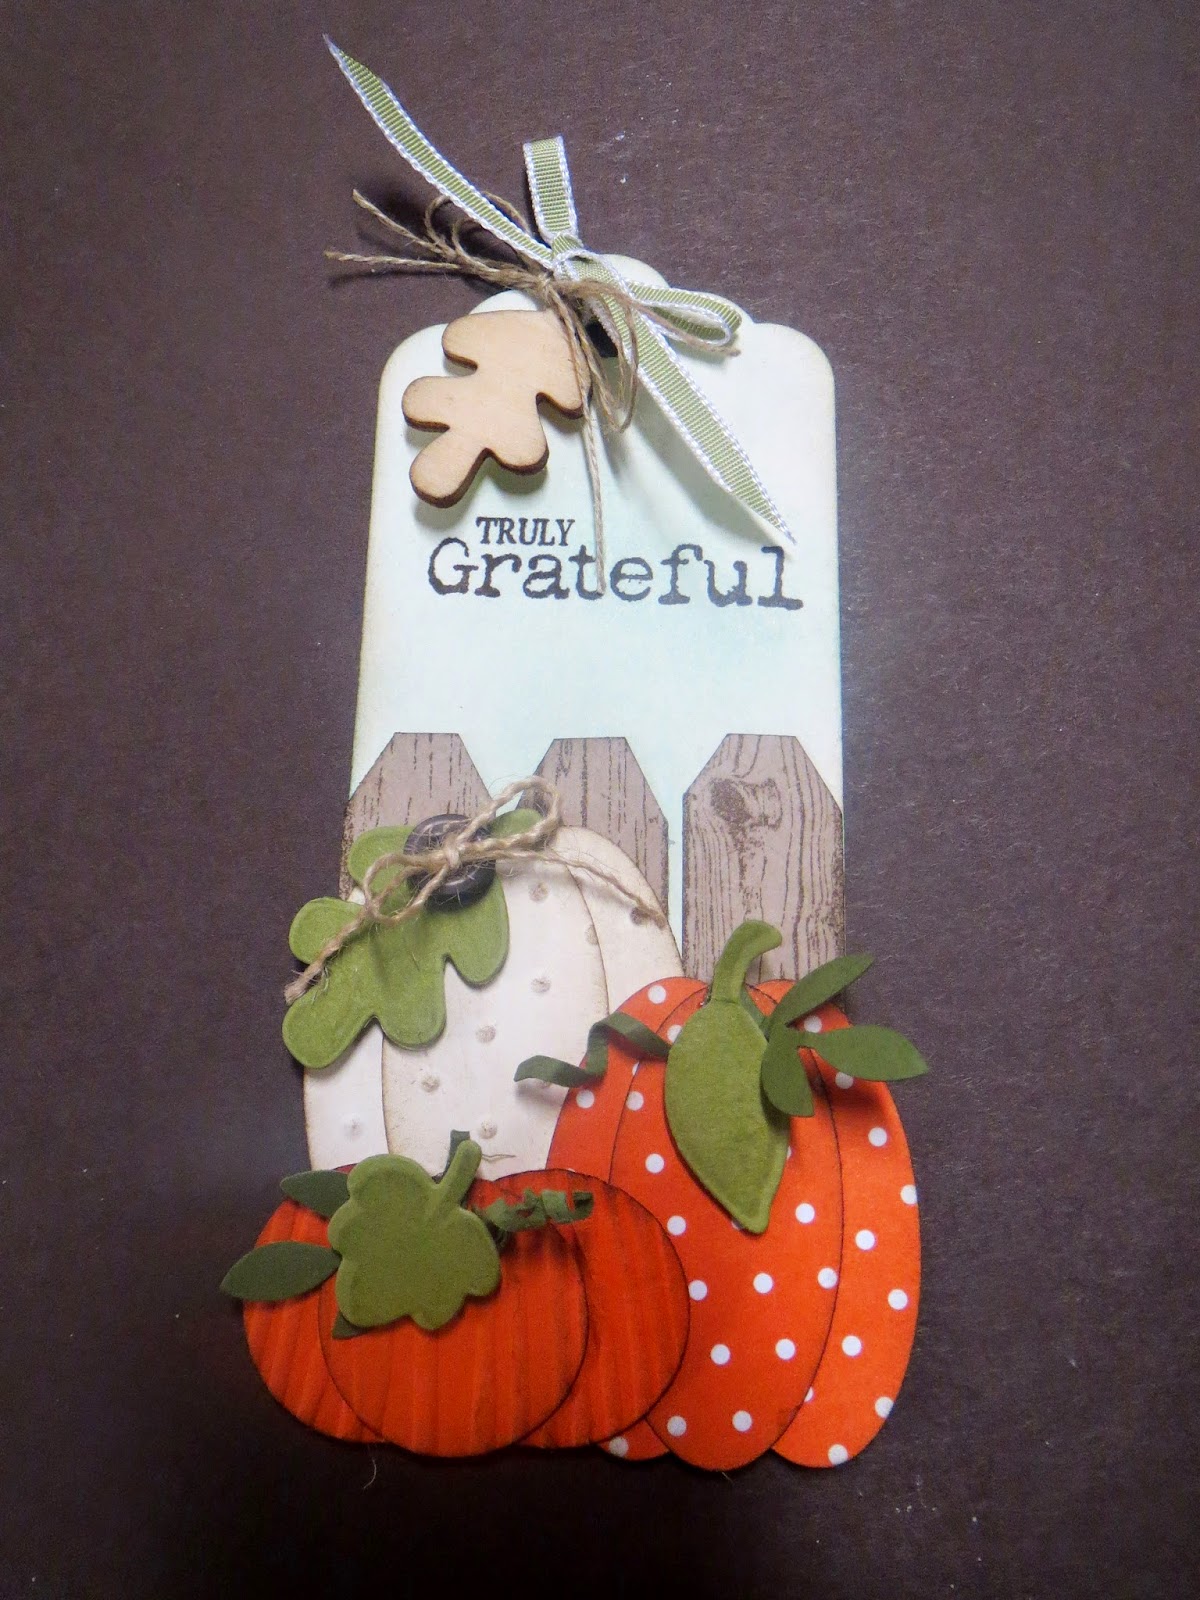
I made this card using the THANKS from the Seasonally Scattered stamp set.  I simply made some pumpkins with the 1" circle punch and the oval punch an adhered them with dimensionals, covering the word thanks.  I LOVE the vines and leaves which I colored with my markers.  The colors I used were Mossy Meadow, Blackberry Bliss and Tangelo Twist.  I did add a strip of Washi tape from the Color Me Autumn set.  The sentiment is from the Gratitude for Days stamp set.  I added a new gold button, some leaves that I watermarked with VersaMark from the Fall Fest stamp set and cut out with  the Fun Fall framelits.  Of course...I had to add a little BURLAP TWINE...my new favorite...to finish it off!

I wanted to do something simple in the inside so I layered a piece of Mossy Meadow card stock on the Blackberry Bliss base and then I added a piece of Very Vanilla layer on top of the Mossy Meadow.  Before I added it though I cut a leaf from the Fun Fall framelits out of the corner....so the Mossy Meadow shows through!  I inked the edges of EVERYTHING with Soft Suede!


Blessings to you and yours today and every day!


Thursday, September 25, 2014

Thankful Tag

Good Thursday Morning to you!  Can you believe it's Thursday already!  This week has flown by!  Yesterday I spent the day with some WONDERFUL friends!  One is a local friend and two of the gals I met through my scrapbooking retreats...I have been so blessed to meet some amazing, wonderful and talented women!  I am really blessed to call many of them friends...and today I was thrilled that they would drive up the mountain to spend the day with me!  

Today I'm going to share a tag I made as a thank-you for a gal who is always buying my cards at my ETSY store!  I have some Stampin' Up! customers that I need to make and send some THANK YOU's too!


I have never been into making tags...but a friend put this challenge on facebook...and I thought...WHY NOT...and I had a reason to make one!  

I loved making it!  Why haven't I been doing this all along?  I have some great ideas for some Christmas tags...I woke up in the middle of the night with a brainstorm....I MUST keep a notebook on my nightstand!


I'm off for a walk now...but when I return, I'm heading out to my workshop to get some things done....so come on back tomorrow!

Have a TERRIFIC day!


Wednesday, September 24, 2014

Filter Paper leave

Good morning!  Hope you are well and in good spirits!  (My upline sent an email out this morning with that greeting...and I loved it...so I used it...she said her priest always greets her that way).

On to today's project!  I'm back with another filter leaves project...a candle holder!  Hope you like it!

I just recycled a jar that I saved because I loved the shape of it!  I used Mod Podge to adhere the leaves to the glass.  I added some burlap ribbon around the mouth of the jar...attached some leaves, some burlap twine and a burlap flower!  


To make the burlap twine...you simply cut the edge off of one side of your burlap ribbon and take it apart...the twine is beautiful!


To make the burlap flower...cut a piece of burlap about 4" long, fold it in half lengthwise and stitch along the long edge...up and down...then pull it together and stitch the ends together.  I adhered a punched circle piece of card stock to the back in order to attach the brad.  I love it!!


Here it is with a lit candle in it!  The photo doesn't show how really beautiful it is shining through the colored leaves!

I love fall and hope to share a few more projects with you soon!  

Have a FANTASTIC day!

Thanks for stopping by....see ya tomorrow!


Tuesday, September 23, 2014

Friends and Coffee

Hello everybody!   It's a beautiful, crisp, fall morning in my neck of the woods!  I'm lovin' it!  Yesterday I totally flaked on you at blogging!  I met a girlfriend at 8:15 for coffee and chatted until 11:00...then went back to the same great place...Mama Llama's...and met another girlfriend for lunch!  What FUN visits I had....it's always nice to catch up with folks!

Here I am...back today for you with a FUN fall project I made over the weekend!  A couple of weeks ago I cut a bunch of leaves out of SU filter paper with my Autumn Accents Die and ran them through drops of ink...just to see how they would turn out...I had know idea what I was going to do with them....


I think they are stunning!  SO VIBRANT and almost real looking!  Well this weekend I was browsing pinterest and saw a bowl made with Mod Podge, a balloon and silk leaves....my mind was spinning...I have all those leaves...I'm gonna try it with my filter paper leaves!


First blow up your balloon to the size that you want your bowl to be and put it inside of a bowl, tied side down, so you can work.  Brush on some Mod Podge and lay your leaf down. 


Brush Mod Podge over the leaves and continue adding more leaves...

...put some extra leaves on the bottom for strength.  In hindsight, I would probably do a few layers all over to make it stronger, but this worked really well...you'll see below!


VIOLA....my beautiful leaf bowl....I need to trim the glue a little bit better, but I LOVE IT!!


Aren't those colors just GORGEOUS!!!
 

...and who doesn't enjoy a Reese's Peanut Butter Cup once in awhile!


Friday, September 19, 2014

...just a couple more CURVY KEEPSAKE BOXES to share!

Good morning!  I'm a little late getting my blogging done today...time just got away from me!  I have a couple of new Curvy Keepsake Box creations to share with you today!  I have SO MANY that I want to make...especially as the holidays get closer!  So here are just a couple!


I have been wanting to make a reindeer so I finally got busy and did it!  Didn't he turn out cute?!  I made this little guy out of Soft Suede card stock...be sure to ink the edges.  The face is made with the smallest oval framelit, the ears are made with the small oval punch and the antlers are made with the stem from the Flower Fair framelits.  I think I will make all of the reindeer from Rudolph the Red Nose Reindeer....what a cute set that will be for Christmas! 


My lion was FUN to make...it brought back a lot of memories.  When my oldest child was little, I made him a lion costume for Halloween and I used gobs of ribbon for his mane....each one of my kiddos wore it as well!  I'm gonna have to drag out those photos!  So I thought...why can't I do that for a Curvy Keepsake Box...and I could...so I did!  I used the 1/4" Cotton Ribbon....don't you just love him!!  His face was punched with the 1 3/4" circle punch, the cheeks with the 1" circle punch and the nose with the new little heart punch.  To attach the ribbon...I simply put red sticky tape on the back of his face and looped the ribbon...I looped two layers...one short...and one a little longer.  Then I added a 2" punched circle in Early Espresso to the back so only the mane shows from the back as well!  

Well that's all I have for you today...

Happy Friday...I hope you all have a WONDERFUL WEEKEND! 


FRIDAY...the golden child of the weekdays.  The superhero of the workweek.  The welcome wagon to the weekend.  The famous F word we thank God for every week!

Thursday, September 18, 2014

Good Thursday morning to you all!  I can't believe another week is quickly coming to a close!  LIFE is FLYING BY!  My mom once told me that life goes FAST after you turn TWENTY-ONE....IT'S SO TRUE!  

Yesterday I had a fantastic workshop with a WONDERFUL group of gals!  I LOVE my time with these ladies...they are so encouraging and fun to be around!  I am BLESSED beyond measure!

I want to share with you a Halloween card that we made!  

I used the Fall Fest stamp set for the ghost and pumpkins.  The sentiment is from the Good Greetings stamp set (free with a $300 workshop or order thru October 31st).  The moon was punched with the 2 1/2" circle punch and the pumpkins and ghost were cut with the Fun Fall Framelits. 

The ghost was heat embossed with white embossing powder and the pumpkins were stamped with VersaMark and then the faces stamped on with Memento Black ink.  I created the glow around the moon by sponging on some Craft White ink.  The sequins add a bit of a sparkle on a dark night....

Tomorrow I have a couple of REALLY CUTE new Curvy Keepsake Boxes to share with you so be sure to check back in! 


Have a FABULOUS DAY.....RELAX and ENJOY LIFE!

I saw this photo on facebook this morning and just had to share it!  It's all in how we look at things!

Wednesday, September 17, 2014

NO INTERNET!!!

YIKES!!! I have been without internet since last Friday!  The company we were with....went bankrupt...closed the doors...gone without notice!  UNBELIEVABLE!  Thank goodness...a local company has bought them out and our internet began working last night!  I hope you missed me....hahaha!

I wanted to share the WEEKLY DEALS with you...and I will be posting more on Thursday as I have still been creating...even without internet!

Gold 1/8 Ribbon by Stampin' Up!
Gold 1/8" Ribbon
Price: $4.95 $3.71
Happy Hour Wood Stamp Set
Price: $29.95 $22.46
Label Card Thinlits Die
Price: $32.95 $24.71
Sweetheart Punch by Stampin' Up!
Sweetheart Punch
Price: $15.95 $11.96
Tangerine Tango Baker's Twine by Stampin' Up!
Tangerine Tango Baker's Twine
Price: $2.95 $2.21
Wooden Elements Embellishments
Price: $4.95 $3.71
Write Stuff II Digital Kit - Digital Download - by Stampin' Up!
Write Stuff Ii Digital Kit - Digital Download
Price: $9.95 $5.97
Yippee-Skippee Wood Stamp Set
Price: $18.95 $14.21

So sorry I haven't been posting...but as long as things are up and running...I'll be up and blogging!  

HAVE A FANTASTIC DAY!!!  See ya TOMORROW!!!
 

Thursday, September 11, 2014

Weekly Deals and New Stamp Set and A Curvy Box Creation!

Good morning....here's to a great day ahead of us!  Today I am praying for my friends in Redding, California that are dealing with a fire that is only 10% contained!  I read this morning that there will be a heavy air attack and ground attack today!  Know that I am thinking about you!

First I want to share this weeks WEEKLY DEALS...I'm a little late getting them out...it's Thursday all ready!  YIKES!


....and here is a new stamp set that is available....I ordered mine yesterday!

                    
I also have a couple of Curvy Box Creations to share with you today!  


I really wanted to do a scarecrow with a hat...but my daughter thinks he's scarey....so today I'm gonna try to cutesy him up a bit!  I LOVE the hat and hair and leaves....just needs a cuter face!  lol
 

I LOVE my snowman!  He turned out exactly how I wanted him to turn out!  

I am sure LOVIN' this fall morning weather (although it's still hot in the afternoon)...but can't wait for enough snow to build a snowman!  


I get to work in my workshop...or play....today!  So come back and visit...I'll have some new inspiration for you!  Hope you find time to CREATE today too!
 

Wednesday, September 10, 2014

Wondrous Wreath for FALL

WOW!!! It's Wednesday already!  The weekend will be here soon...YIPPEE!!  I have a QUICK and EASY card to share with you today!  This stamp set...Wondrous Wreath, is such a great set, with so many possibilities!  You can ink it with pens or stamp pads.  I used the stamp with sparse leaves and stamped it in Tangelo Twist, then Hello Honey and then Mossy Meadow.  You are suppose to line up the tab each time...but not for this look or the leave would cover each other totally...so I moved it just a bit...it's a photopolymer set so you can totally see where you will stamp...LOVE THAT! I cut it out with the Wonderful Wreath framelits and I then adhered it with dimensionals to a piece of Early Espresso cardstock (4" x 5 1/4") which I had ran through the Woodgrain embossing folder.  I added some Burlap "twine", some Crushed Curry 1/8" Taffeta Ribbon tied into bows and a piece of White and Tangerine Tango Two-Tone Trim which I knotted and frayed.  The sentiment is from the Good Greetings stamp set and I stamped it in Early Espresso on a wooden banner from the Essentials Wooden Elements set.

Thanks bunches for stopping by!  I hope you are feeling inspired to create something fall!
Keep Calm and Enjoy #Fall, #autumn

Tuesday, September 9, 2014

Hello Fall and the Masking Technique


GOOD MORNING this delightful FALL day! I am LOVING the cooler air in the mornings!  It's invigorating and refreshing!  My kiddos think its just so COLD! 

Today I wanted to show you a card that I made using the MASKING TECHNIQUE.  First I cut the leaf out in scratch paper using the Autumn Accents Bigz Die so that I could use it as a mask.  I placed it on the Very Vanilla cardstock that I wanted to use for my card and then sponged the inside with Tangelo Twist, Hello Honey and Mossy Meadow.  I then stamped the scenery from the Serene Silhouettes stamp set in Memento Black ink.  The sentiment is from the For All Things stamp set.  For the leaves I sponged the above colors on a piece of scratch Very Vanilla cardstock and then cut them out with the Fun Fall Framelits. I then ran them through the Woodgrain embossing folder.  I added some Mossy Meadow 3/8" Satin Ribbon and some Burlap "twine" and an acorn from the Autumn Wooden Elements (LOVE THESE!).  I am THRILLED with how it turned out!   I want to use this technique more often!!


My inspiration for this card was from Splitcoaststampers 
 ...it's a BEAUTIFUL card
handmade card ... sweet sunset scene sponged and stamped through a stencil in the shape of a maple leaf ... beautiful colors ... cattail silhouettes just right for a lakeside scene ... great card!!

Monday, September 8, 2014

The GREAT Pumpkin!

Good morning one and all!  I hope you had a FABULOUS weekend!  Mine absolutely FLEW by!  I played hooky from blogging on Friday, because my daughter, Sarah was home and we decided to go on an adventure with my other daughter Rebecca!  We went to my son's workplace and HI-JACKED his Jeep and took it for a cross country (in Trinity/Shasta County) trip!  We had a blast....but boy did we get dirty!  That night...we went to The Corner Mart here in Weaverville, where we enjoyed listening to The Buckhorn Mountain Stompers and drank a Fall River Brewery Blonde beer.  The rest of the weekend was full with running kids to lessons, soccer games and friends houses...but I did find time to create!

Today I want to share a pumpkin card that I made using my Oval Framelits!  

Isn't it a GREAT card?  I embossed it with the Beautiful Baroque embossing folder.  The sentiment from the For All Things stamp set.  I made leaves with the Fun Fall Framelits.  OF COURSE...I had to ink all of it to make it look more rustic...the burlap ribbon (taken apart) helped with that as well!
Here is the inside of the card...room to write your special thoughts!


Thanks for stopping by today!  I hope your week is WONDERFUL!


“Each year, the Great Pumpkin rises out of the pumpkin patch that he thinks is the most sincere. He's gotta pick this one. He's got to. I don't see how a pumpkin patch can be more sincere than this one. You can look around and there's not a sign of hypocrisy. Nothing but sincerity as far as the eye can see.”

Thursday, September 4, 2014

Fall is in the air!

Hey Everyone!  Hoping your day is going well!  I'm STRANDED at home today...no car!  We had to buy new tires and they are being installed today!  I did get to go to the gym at 5am this morning though....

Today....I HAVE A CARD for you!  See...you can trust me!  I love fall...and I woke up to a chilly fall morning today...only 46 degrees....I LOVE IT!  I'm so ready for the hot days to be over...and I'm praying for lots of rain and snow...to end the drought in California!  ALL THAT to say...I have a fall card for you today!

Today's card was made using the Wondrous Wreath, Hardwood and For All Things (for the sentiment) stamp sets!  I used the new In Colors, Blackberry Bliss, Mossy Meadow, Hello Honey and Tangelo Twist.  These colors are so deep and rich...I LOVE THEM!  The window and shutters were stamped in Sahara San on Whisper White cardstock. 


Here is the inside of the card....I had to add just a bit of color

I want to make a card kind of like this only with a door instead of a window...so stay tuned!


As ALWAYS....THANKS FOR STOPPING BY!   
18 Quotes That Will Make You Fall in Love With Autumn

Wednesday, September 3, 2014

Just a FEW more Curvy Keepsake Box Creations

WOW!  It's Wednesday already!  Too often life just flies by!  I have been OBSESSED with this Curvy Keepsake Box Die...I am so sorry...that's all I have been doing!  (I did mop my floors yesterday...and do a little laundry!)  I PROMISE....I am going to have something different for you tomorrow!  

....but today...I have a few more creations for you!


Yesterday I shared a horse that I had made for my nine year old daughter so today I have to show you a baseball I made for my SOON TO BE TWELVE year old son...he said to me this very morning...13 days until my birthday.  I silently gasped...I hadn't realized it was so close!  YIKES! Time REALLY does fly by!  ANYWAY...I used the Chevron Border punch to make the stitches on the baseball...I had to add the stitches while it was laying flat so they would stay adhered! 


Here's an up close of the tag...made with the Stars framelit and the Playful Pennants stamp set.  I forgot that I had a punch to punch them out...so I fussy cut them...and then I found my Petite Pennants Builder punch!  That would have made things a little easier! 

My birdhouse is my FAVORITE!  This will make such a cute Christmas ornament!  I used the Hardwood stamp and the Bird Builder punch and the grass is made with the fringed scissors...I just cut some strips and wadded them up!  EASY!


This adorable sentiment is from the Endless Wishes stamp set....and don't you just LOVE the snowflake sequins?  They are in the Frosted Sequins set found in the Holiday Catalog! 
 

I made these flowers with the Flower Fair Framelit Dies and the Spiral Flower Die.  The leaves are from the Bird Builder punch, the HI is stamped with Skinny Mini Alphabet stamp set.  I think this will make a really cute table place settings or gifts for a gathering!


 As always...thanks for stopping by!  Have a FANTASTIC day...and find time to CREATE!


Tuesday, September 2, 2014

Are you ready for some MORE Curvy Keepsake Box FUN? .....WEEKLY DEALS are here too!


GOOD TUESDAY MORNING to you all today!  I hope your week is starting of BEAUTIFULLY!  I have a few more creations to share with you using the Curvy Keepsake Box Die....I am COMPLETELY ADDICTED to this die!  It is SO MUCH FUN and has SO MANY POSSIBILITIES!


First I have my candy corn!  Very simple to make!  Just cut out two Curvy Keepsake Box pieces in Very Vanilla, two in an orange color (I used Tangelo Twist) and two in a yellow (I used Hello Honey).  It's best to use designer paper for your layers...I know this because I tried to use cardstock...but it was WAY TO THICK...and wouldn't fold right...and looked TERRIBLE!  The sentiment is from the stamp set That's the ticket!

My nine year old daughter, Kathryn, is IN LOVE with horses!  She has that blood....her dad grew up with horses and was a team roper for awhile....but that third child coming along was the end to us having horses.  She desperately wants her own horse...so I made this for her!  I used the Extra Large Oval punch and the Owl Builder punch for the head, the ears are made with the Sweetheart punch (just cut it in half).  The eyes are from the Owl Builder punch (you can also use the 1/2" and 1/4" circle punches)...Candy Dots for inside of circles from the 1/4" punch for the nostrils.  The stamped image is from the new YEE-HAW stamp set....it is so dog gone cute!                                      

The face of my cow is made with the Extra Large Oval punch, the spots all around the cow, the horns and the eyes  are all made with the Owl Builder punch,  the nose is made with the Large Oval punch...which I punched out in Pink Pirouette and then punched again to make it smaller.  The small oval punch is just too small.  The ears are made with the Pansy punch...I punched out one petal and cut it in half.  The cow bell is made with the square charm that is part of the Curvy Keepsake Box Die that I made the body out of.  I trimmed it to look like a cow bell.  On both the cow and the horse...I cut an extra Extra Large Oval out so that I could back the faces with...that way they look good from the back too!

I also have the WEEKLY DEALS for you!


Thanks bunches for stopping by today!  I hope you feel inspired!  I'd LOVE to hear what you think...so leave a comment if you have a moment!  

Have a wonderful day and REMEMBER....


It's March 17th.......

 Have a FANTASTIC day and ENJOY the corned beef & cabbage!