Darla Daisies Loyalty Program & Tracking Form

Darla Hutt-Watson

My photo
Weaverville, CA, United States
Hi there! I'm Darla and I live in BEAUTIFUL Northern California! I am a mother of seven terrific kids and have been married to my husband for 32 years. I have been a Stampin' Up Demonstrator since 2010 and love ALL THINGS paper crafting. I also have a scrapbooking retreat business called Scrap Happens Retreats. I love teaching and learning new techniques, sharing ideas, hosting my retreats, being a wife and a mom. Hiking, bicycling, gardening and cooking are a few of my other hobbies. I'm living for Jesus and LOVIN' LIFE!!

Monday, April 30, 2018

"Make-It Monday" We Must Celebrate

Good morning everyone!  How's this Monday morning treating you?  They're pouring concrete at my house today...I'm gonna have a bathroom and a porch for my workshop!  I'm VERY EXCITED!

It's "Make-It Monday" time! I hope you find a moment to create today...ENJOY!


"Make-It Monday": We Must Celebrate card created with Stampin' Up! products
All images © 1990-2018 Stampin’ Up!® 

These little critters are retiring May 31.

Supplies:
  • Stamp Sets – We Must Celebrate Clear Mount Stamp Set (145898); Blossoming Basket Stamp Set (147124)
  • Card Stock – Pool Party (122924); Bermuda Bay (131197); Whisper White (100730)
  • Stamp Pads – Memento Black Ink (132708); Archival Basic Gray (140932)
  • Miscellaneous – Picture Perfect Party 6" X 6" Designer Series Paper or "DSP" (145559); Stampin' Blends Markers Dark Smoky Slate (145055),  Bronze (144607);  Dark Crumb Cake (144581), Light Crumb Cake (144582); SNAIL Adhesive (104332); Rhinestone Basic Jewels (144220)
        
Measurements:  

  • Pool Party Card Stock: 8 1/2” x 5 1/2”                  
  • Bermuda Bay Card Stock: 5 1/4” x 4” and 4” x 3 1/4”
  • Whisper White Card Stock: 3 3/4” x 3”                       
  • Picture Perfect Party DSP:  5” x 3 3/4”             
        
Instructions:

  1. Take your Pool Party Card Stock and fold it in half creating a 5 ½ x 4 ¼ card base.
  2. Stamp your animal image using Memento Black Ink onto your whisper white card stock.
  3. Color your stamped image to your liking using the Stampin’ Blends Markers.
  4. Stamp your sentiment above your colored image using the Basic Black Ink.
  5. Layer your colored card front onto the smallest piece of Bermuda Bay Cardstock.
  6. Then layer the colored image and cardstock onto the Picture Perfect Party DSP.
  7. Finally layer the colored image/card stock and DSP onto the final piece of Bermuda Bay card stock and adhere it to the Pool Party card base.
  8. Finish off your card by adding Rhinestone Basic Jewels for a little bit of bling.

Thanks BUNCHES for stopping by today!  Don't forget to stop by tomorrow for Tuesday's Tip...another video with a Waterfront creation!  Have a FANTASTIC day!!!

REMEMBER....use hostess code  MRS4BR22 and place a minimum $50 order (before tax and shipping)...and receive the gift pictured below FREE!

Stampin' Spritzer and Corrugated Elements
(a $6.50 value)


You'll also receive the following...

  • Get a Darla Daisy for every $50 spent (before tax & shipping)
  • The projects we make in my April classes!


If your order is $150 or more, DO NOT use the code because you will receive hostess credits. You will get the gift from me FREE automatically along with  the projects we make in April classes!

Your FREE gifts will be shipped separately and will be shipped by the 1st week in May or before.

 ~Today's Thought~


Friday, April 27, 2018

Tutti Frutti Cupcake Holder

Hello there!  Hope your day is going wonderfully!  It's a rainy day here in Weaverville...just had a downpour...and some thunder...I LOVE IT!  My husband and I have spent the entire day together.  We took the kids to school, had our weekly "dump" date...yes we take our garbage to the dump, went out to lunch and watched some cycling races together!  It's been wonderful! He has Friday's off now...until daylight savings time ends, so we'll have some more days like this for sure!

Today I want to share a REALLY CUTE cupcake holder that I made on Monday.  I had a friend from Oklahoma message me to see if my daughter could make some cupcakes for another friend, who lives here, for her birthday.  She was at school and couldn't, but there were a few left from her taking them to our local coffee shop to sell. Normally I have a hard time resisting them so I was really excited to be giving one away as a birthday gift! I said...HEY...I can make a CUTE box to put it in and she was THRILLED!

Here is the ADORABLE little box with one of her Pina Colada cupcakes inside!  I LOVE IT!!

I used Real Red cardstock, Lemon Lime Twist cardstock and Tutti Frutti designer paper. The sentiment is from Beautiful Bouquet stamp set. I also used Linen Thread and Lemon Lime Twist 1/2" Finely Woven Ribbon. The sentiment is attached with a rustic safety pin that I found online!  SUPER CUTE and SUPER QUICK to put together!  The directions with photos are below!


First, cut a 5" X 11" piece of cardstock.  As you can see from the photo,  lay in in the landscape position and score at 3 1/2", 6 1/2", 7 1/2" and 10 1/2".


In the portrait position, score it at 1" and 4"

Below is how I cut it once it is scored and where I added tape. You can see on the side that I cut the smaller flaps at angles...this is so they lay better and don't go over the top if that makes sense! You also need to cut your circle with a Circle framelit (sorry that photo did not upload...yikes)


This is how it will look when it is folded together.  You can see that the back will barely go above the cupcake once inserted so I also made a back!

You can see in the above photo that the backing is Lemon Lime Twist and measures 2 7/8" X 4 7/8" with a piece of Tutti Frutti designer paper measuring 2 3/4" X 4 3/4". 


You can see here that I added the additional backing to make it taller as well as how the angled flaps fit right inside of the box...they don't go over the top!


Adhere everything...last being the two side flaps.  I do those last so it has smooth edges on both sides.  If you bring the bottom flaps up, you won't have that smooth edges. 


To finish it off add a cute little front with a 7/8" X 2 7/8" piece of Lemon Lime Twist cardstock and a 3/4" X 2 3/4" piece of Tutti Frutti designer paper!

SUPER CUTE...SUPER FUN...SUPER QUICK!!  I hope you'll give it a try!

Thanks BUNCHES for stopping by!  Have a FANTASTIC weekend...enjoy EVERY MINUTE of it!


REMEMBER....use hostess code  MRS4BR22 and place a minimum $50 order (before tax and shipping)...and receive the gift pictured below FREE!

Stampin' Spritzer and Corrugated Elements
(a $6.50 value)


You'll also receive the following...

  • Get a Darla Daisy for every $50 spent (before tax & shipping)
  • The projects we make in my April classes!


If your order is $150 or more, DO NOT use the code because you will receive hostess credits. You will get the gift from me FREE automatically along with  the projects we make in April classes!

Your FREE gifts will be shipped separately and will be shipped by the 1st week in May or before.

 ~Today's Thought~
Be a beautiful cupcake in a world full of muffins. #JulepQuotes


Thursday, April 26, 2018

Beautiful Day

Good morning everyone!  How's life?  Are you too busy?  Is there too much going on?  Well...that's my life.  I keep thinking it will slow down, but it never does.  Yesterday was crazy busy with tons of little things...I didn't create, I didn't blog.  I'm behind on getting my cards and gifts out to my March customers (they're going out today...SORRY!).  I'm trying to treat my Stampin' Up! business as a job that I go to everyday. To be more organized...I schedule appointments in the afternoon so I can create and get SU things done in the morning, but things always come up.  

Yesterday, I helped a neighbor get her back yard ready for photos so she can put her house on the market.  Her husband passed a couple of months ago, she's in her 80's and she is moving in with her son and daughter-in-law who live a few hours away.  It was a wonderful time...we visited as we worked, she shared her wisdom about life and a little of her sadness about moving.  Later I went and mowed my mom-in-laws grass for her and then I went to my afternoon appointments (kid stuff) and ran errands.  When I went to bed I realized I hadn't blogged...I hadn't done any BUSINESS stuff...which is my daily goal.  I realized that PEOPLE, RELATIONSHIPS are the most important part of my day and I am in a unique position to make PEOPLE and RELATIONSHIPS the most important part of my day as my JOB (SU) is flexible!  I realized how blessed I am and went to sleep smiling about my day...not stressed about not blogging, not stressed for not creating, not stressed about all the things that I didn't get done!

This morning I'm here to blog what I was going to blog yesterday...and that's ok!  I hope you like it!

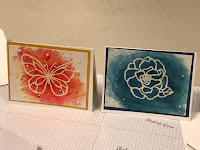
This is the card I created for my Shascade (adult special needs class).  They LOVE to color and we've used the Stampin' Blend Markers, Colored Pencils and Aqua Painters so on this day I thought it would be really fun to teach them how to use the Brusho Crystals. This meant that they also learned how to heat emboss!  First they could choose the butterfly or the flower from the Beautiful Day stamp set.  They stamped their image with VersaMark, covered it with White Embossing Powder and used the heat gun to heat emboss the image (they needed a little help with the heat gun because it was burning their fingers - I can relate).  Next they went to the Brusho station and tapped away!  They all remembered NOT to take the lids off...just take the tacs out and tap.  I was impressed because I have often taken the lid off, not thinking about it...and made a big mess!  I also gave them the option to use a dauber to apply the color (if they wanted less mess) but only one of them chose the daubers!  

Here are their creations! They did a GREAT job!


There was a new guy at class...Tim, he was probably in his late 40's early 50's.  He was SOOOOOO EXCITED to be at ART class!  He had so much fun that he decided that he would come to ART class from now on!  I LOVE that he sees it as ART...because it truly is...and it's their art!

Hey...thanks for stopping by today!  Thanks for allowing me to share my creations with you, but also a little bit of my life with you!  I am grateful! Have a BEAUTIFUL DAY!


 REMEMBER....use hostess code  MRS4BR22 and place a minimum $50 order (before tax and shipping)...and receive the gift pictured below FREE!

Stampin' Spritzer and Corrugated Elements
(a $6.50 value)


You'll also receive the following...


  • Get a Darla Daisy for every $50 spent (before tax & shipping)
  • The projects we make in my April classes!


If your order is $150 or more, DO NOT use the code because you will receive hostess credits. You will get the gift from me FREE automatically along with  the projects we make in April classes!

Your FREE gifts will be shipped separately and will be shipped by the 1st week in May or before.

~Today's Thought~


Tuesday, April 24, 2018

Tuesday’s Tip - Waterfront Series - Mountain Scene

Hello everyone!  I just finished with my Shascade class...what a group! I love teaching them and they are so exited to come!  I'll share their creations soon!

Today is Tuesday and that means it's time for Tuesday's Tip!  I hope you enjoy this video on how to create a beautiful mountain scene with the Waterfront stamp set! Below are the measurements!  I do hope you'll give it a try!


Here is a picture of the finished card...isn't it beautiful!  

Here are the measurements.  My Whisper White card base  is 8 1/2" X 5 1/2".  The stamped image is a 3 1/2 " X 4 1/2 piece of Whisper White cardstock.  After stamping I adhered it to a 3 5/8" X 4 5/8" piece of Whisper White cardstock. Last, I attached it to a 3 3/4" X 4 3/4" piece of Basic Gray.

I so hope that you enjoyed my video and that you'll give this card a try!  Thanks BUNCHES for stopping by!  Have a great rest of your day!


REMEMBER....use hostess code  MRS4BR22 and place a minimum $50 order (before tax and shipping)...and receive the gift pictured below FREE!

Stampin' Spritzer and Corrugated Elements
(a $6.50 value)


You'll also receive the following...


  • Get a Darla Daisy for every $50 spent (before tax & shipping)
  • The projects we make in my April classes!


If your order is $150 or more, DO NOT use the code because you will receive hostess credits. You will get the gift from me FREE automatically along with  the projects we make in January's classes!

Your FREE gifts will be shipped separately and will be shipped by the 1st week in May or before.

~Today's Thought~


Monday, April 23, 2018

"Make-It Monday" Truly Tailored Suitcase

Good Morning everyone!  I hope you had a FABULOUS weekend!  Did you find any time to create? Sadly, I did not!  I did participate in a 40 mile bike ride, a fundraiser for Yuba-Sutter Childrens Type 1 Diabetes!  I rode the entire 40 miles in three hours (which was my goal)...I was thrilled!  I'm now training to do a 100 miler in June around BEAUTIFUL Lake Almanor, here in Northern California! I'm really nervous and very excited! 

It's "Make-It Monday" time and it's a REALLY CUTE project!  It's specifically for Father's Day but could easily be changed up for Mother's Day, a graduate, a vacation send off...just by changing the designer paper and/or cardstock!  SO MANY POSSIBILITIES!


"Make-It Monday": Truly Tailored suitcase created with Stampin' Up! products
All images © 1990-2018 Stampin’ Up!® 

Supplies:
  • Stamp Sets – Truly Tailored (c-145735, w-145732) OR Bundle with Tailored Tag punch (c-147752, w-146089)
  • Card Stock – Chocolate Chip (102128); Crumb Cake (120953); Very Vanilla (101650)
  • Stamp Pads – Chocolate Chip (126979); Night of Navy (126970)
  • Misc. – True Gentleman Designer Series Paper (DSP)  (145593); Night of Navy Corduroy Ribbon (145597); Tailored Tag punch (145667- or bundled with stamps); Dimensionals (104430); 2-1/4” Circle punch (111113); Multipurpose Liquid Glue (110755); Empty Paper Pumpkin box!
        
Measurements
  • Chocolate Chip: Two 6-1/2” x 1-1/4” strips, 2-1/2” x 8” strip  (Optional: 2” x 9-1/4” for inside box)  
  • Vanilla and Crumb Cake: 2 scraps to stamp on
  • Corduroy ribbon: 2 - 18” strips                    
  • Designer Series Paper (DSP): 12” x 4” and 6” x 4” (both cut in the same direction)         
Optional: A full sheet of DSP for inside of box + 1-3/4” x 9-1/4” matching strip.
        
Instructions (NOTE- this project uses Multipurpose Liquid Glue to assemble, unless noted):
  1. Take apart an empty Paper Pumpkin box and turn it inside out to reassemble.
  2. Glue the two 6-1/2” Chocolate Chip strips together for handle and let dry.
  3. Adhere the 12” x 4” DSP around the middle of the box on the outside, starting with the front flap, creasing at the edges of the box as you go. When you run out of DSP on the back of the box, adhere the 12” x 6” piece the rest of the way, creating a complete wrap.
  4. Stamp “Classy” sentiment in Chocolate Chip on Vanilla card stock and punch out using Tailored Tag punch. OPTIONAL: Stamp “Lookin’ Sharp” sentiment on Vanilla card stock with Night of Navy ink and punch out with Tailored Tag punch for inside box.
  5. Stamp “Dapper Day” sentiment in Navy on Crumb Cake card stock. Punch out with 2-1/4” circle punch.
  6. Punch 3 more 2-1/4” circles from Chocolate Chip strip and cut each circle into quarters. Adhere to the corners of the box (front, side and top only). IMPORTANT: When adhering the quarter circles to the front of the box, don’t glue the box shut! Just adhere them to the front section so you can open the box.
  7. Once dry, score the Chocolate Chip strip at 3/4”, 1-1/4”, 5-1/4” and 5-3/4” to form the handle. Adhere handle ends to top of box (on the flap that opens) on each side of DSP runner.
  8. Adhere each length of ribbon along the side of the DSP panel.
  9. Attach “Dapper” saying to front of suitcase and then “Classy” tag with dimensionals.

OPTIONAL:
Cut non-directional piece of DSP to 12” x 9-1/4” and score along the 12” side at 1-5/8”, 7-7/8” and 9-1/2”.  Cut the left-over piece to 9-1/4” x 2-3/4”. Adhere larger (scored) piece into the bottom of the box and the smaller strip at the top (as shown below). The extra 1-3/4” x 9-1/4” strip to the flap, if desired. Add the 2” x 9-1/4” strip of Chocolate Chip card stock in the empty space. Add the “Looking Sharp” tag.


Isn't this a SUPER CUTE project?  I just love it and can't wait to play with it some more!  I'll be sure to share what I do!

Thanks for stopping by today! Have a MARVELOUS Monday...hope it's a GREAT start to the rest of your week!


REMEMBER....use hostess code  MRS4BR22 and place a minimum $50 order (before tax and shipping)...and receive the gift pictured below FREE!

Stampin' Spritzer and Corrugated Elements
(a $6.50 value)


You'll also receive the following...


  • Get a Darla Daisy for every $50 spent (before tax & shipping)
  • The projects we make in my April classes!


If your order is $150 or more, DO NOT use the code because you will receive hostess credits. You will get the gift from me FREE automatically along with  the projects we make in January's classes!

Your FREE gifts will be shipped separately and will be shipped by the 1st week in May or before.

~Today's Thought~


Friday, April 20, 2018

Sheltering Tree

Hello and Happy Friday!  I had something else planned for today, but my husband asked me if I'd like to go for a bike ride before our sons baseball game and OF COURSE I said YES!!! Now...I'm flying to get ready and get posted!!

I received this BEAUTIFUL card from my upline, Sarah Wills at sarahsinkspot.com ...I LOVE it and thought I'd share it with you!  She always sends me a card and some goodies for my sales on her team...it's very sweet and generous!

The tree and the sentiment are both stamped with the Sheltering Tree stamp set.  The flowers and the clouds are punched out with the Tree Builder Punch.  I LOVE the colors that she chose...Island Indigo, Soft Suede, Cherry Cobbler, Early Espresso and Crushed Curry!  I also LOVE how she only put the Basic Rhinestone Jewels on a few of the flowers...SUPER CUTE!!

Well...that's it!  I'm off for a ride!  THANKS BUNCHES for stopping by!  Have a FANTASTIC weekend!!


REMEMBER....use hostess code  MRS4BR22 and place a minimum $50 order (before tax and shipping)...and receive the gift pictured below FREE!

Stampin' Spritzer and Corrugated Elements
(a $6.50 value)


You'll also receive the following...


  • Get a Darla Daisy for every $50 spent (before tax & shipping)
  • The projects we make in my April classes!


If your order is $150 or more, DO NOT use the code because you will receive hostess credits. You will get the gift from me FREE automatically along with  the projects we make in January's classes!

Your FREE gifts will be shipped separately and will be shipped by the 1st week in May or before.

~Today's Thought~

Tuesday’s Tip - Sweetest Star

Hello there and WELCOME to my blog!  Today is time for another Tuesday's Tip Video~  I hope you are inspired to create! MEASUREMENTS for...